How to Replace the Charger Port on Your iPhone

If you’ve been facing issues with your iPhone’s charging port you might be considering a repair. Replacing the charger port on your iPhone can seem daunting but with the right tools and a bit of patience it’s a task you can tackle at home. A faulty charger port can lead to connection problems making it difficult to charge your device efficiently. Therefore addressing this issue promptly can save you from further complications down the line.
Before diving into the replacement process it’s crucial to understand the symptoms of a failing charger port. Common signs include intermittent charging the cable not fitting properly or the device not recognizing the charger at all. Recognizing these indicators will help you decide if replacing the charger port is necessary. In this article we will guide you through the steps to successfully replace the charger port on your iPhone ensuring that you can get back to using your device without interruptions.
The Charger Port Issues
When you think about your iPhone one of the most important parts is the charger port. This is the little hole where you plug in your charger. If your iPhone doesn’t charge properly the charger port could be the problem. How to replace the charger port on your iPhone is a question many people ask when they start having issues. Signs that your charger port is not working include the phone not charging at all or the charging cable being loose. Sometimes you might have to wiggle the cable to get it to charge which is very frustrating!
It’s good to know what can go wrong with the charger port. Dust and dirt can get inside the port and make it hard for the charger to connect. If you drop your phone it can also hurt the charger port. This is why it’s essential to keep your phone safe and clean. If you notice these problems you may need to replace the charger port to make your phone work again. Remember before you start you need to be sure that the charger port is the issue and not the cable itself.
Gathering the Necessary Tools and Materials
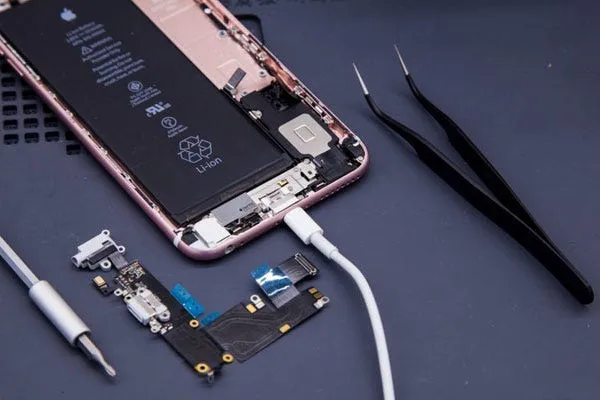
Before you start the process of replacing your charger port you need to gather some tools and materials. First you will need a new charger port that fits your iPhone model. You can buy this online or from a store that sells phone parts. Next you will need some small screwdrivers, specifically a Pentalobe screwdriver and a Phillips screwdriver. These tools will help you take apart your phone carefully. You may also want to have a plastic opening tool and tweezers to help with the small parts.
It’s also a good idea to have a clean workspace where you can lay out your tools. This will help you stay organized while you work. Make sure to have a soft cloth or mat to place your iPhone on. You don’t want to scratch it! Having everything ready before you start is essential for how to replace the charger port on your iPhone effectively. If you miss any tools you might get stuck in the middle of your repair which can be very frustrating.
Preparing Your iPhone for Repair
Once you have all your tools ready it’s time to prepare your iPhone for repair. First make sure your phone is turned off completely. This is very important because you don’t want to accidentally turn it on while you are working on it. You should also remove the SIM card from your iPhone. Use a paperclip or the tool that came with your phone to take out the SIM card. Keeping the SIM card safe is important as you will need it later.
After that you should clean the area around the charger port. Use a soft brush or a can of compressed air to blow out any dust. This step is very important because it can help you see if the charger port is damaged. Once everything is clean you are ready to start taking your iPhone apart. Knowing how to prepare your iPhone for the repair process will make how to replace the charger port on your iPhone easier and safer.
Step-by-Step Guide to Replacing the Charger Port
Now comes the most exciting part: replacing the charger port! Start by using the Pentalobe screwdriver to remove the screws near the charger port. Be very careful and keep the screws in a safe place so you don’t lose them. Once the screws are out you can gently use the plastic opening tool to lift the screen away from the body of the phone. It’s essential to do this slowly to avoid damaging any cables inside.
After you have the screen open you will see the inside of your iPhone. Now you can locate the charger port. It may be attached with screws so you will need to use the Phillips screwdriver to remove them. Carefully disconnect the old charger port from the motherboard. Once that’s done take the new charger port and connect it to the motherboard. Make sure it fits snugly and securely. Following this step-by-step guide will help you understand how to replace the charger port on your iPhone with ease.
Testing the New Charger Port
Once you have installed the new charger port it’s time to test it! First carefully put your iPhone’s screen back in place making sure not to pinch any wires. Then screw everything back together using the screws you saved earlier. After you’ve reassembled your iPhone, turn it back on. You should see the Apple logo on the screen which means your phone is starting up correctly.
Now comes the most important part: testing the new charger port. Take your charging cable and plug it into the new port. If your phone starts charging then you did a great job! If it doesn’t work, double-check all your connections to make sure everything is in place. Testing the new charger port is crucial to confirm that your efforts in how to replace the charger port on your iPhone were successful and that your phone is ready to go again.
Common Mistakes to Avoid
While replacing your charger port can be fun and rewarding there are some common mistakes to watch out for. One big mistake is forgetting to turn off your iPhone before starting. If you accidentally turn it on you might get a shock or damage something inside. Another mistake is losing screws. When taking apart your iPhone it’s easy to misplace small screws so always keep them in one spot.
Another thing to be careful about is applying too much force. If something doesn’t seem to come off easily don’t pull or push too hard. You could break parts of your phone. Also make sure to follow each step carefully. Rushing can lead to missing a crucial part of the process. Being aware of these common mistakes will help you succeed in how to replace the charger port on your iPhone and avoid any unnecessary issues.
When to Seek Professional Help
Sometimes even with the best instructions you might find that replacing the charger port on your iPhone is too hard. If you feel unsure or if your phone has other problems it’s okay to ask for help. There are many professionals who know how to fix iPhones and can do it quickly. Visiting a professional repair shop might be a better option if you worry about making mistakes or damaging your phone.
It’s also important to know that opening your iPhone may void the warranty. If your phone is still under warranty it’s best to take it to an authorized service center. They will have the right tools and expertise to fix your charger port without harming your phone. Knowing when to seek professional help is an essential part of learning how to replace the charger port on your iPhone safely.
Conclusion
Learning how to replace the charger port on your iPhone can be a fun and educational experience. It helps you understand more about how your phone works and gives you a sense of accomplishment when you finish the job. Remember to take your time, follow the steps carefully and don’t hesitate to ask for help if you need it. Taking care of your iPhone is very important and knowing how to fix it can save you money and keep your device running well.
By understanding the issues gathering your tools preparing your phone and following the steps carefully you can successfully replace the charger port. Even if it feels challenging, remember that many people have done it before you. If you follow the guide and stay focused you will be able to enjoy your iPhone without charging issues again!


